3D Pose Search for Artists

Use the 3D pose search tool to find real drawing references by body part, joint position, and camera angle.

Pose editor

Loading the 3D skeleton…

Reference photos

Loading the photo index and running the left elbow example…

Photo preview

How 3D Pose Search Works

Start with the part you need to draw. Set that joint on the skeleton, then compare how it bends and sits in the pose search results.

  1. Choose a joint or body part

    Use Body part to select the area that drives the drawing. You can also tap a joint on the skeleton. The highlighted bones show what the pose finder will compare. Keep Gender on Any for the widest starting set. A narrower filter can help with a specific study, but it also removes references that might otherwise supply a clearer angle.

  2. Adjust the 3D skeleton and camera

    In Orbit, drag the background to set the camera. Grab a circle on the skeleton and drag it to change the pose. Shift and drag a circle to twist that joint. Pan, the zoom buttons, and Reset pose give you finer control over the view. Set the bend first, then rotate the view until the foreground limb overlaps the torso about as much as it does in your sketch.

  3. Search and open a reference

    Select Find photos after adjusting the skeleton or camera. Changing a filter refreshes the results automatically. Compare several crops, then open a photo to inspect the full frame and photographer credit. On narrow screens the gallery sits below the editor. Use Show more photos to browse the next group of matches.

An Elbow Study with 3D Pose Search

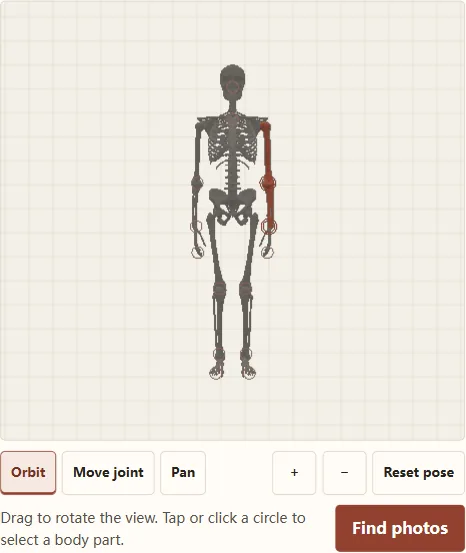
Pose Search editor with the left upper arm and forearm highlighted in terracotta
The left elbow and surrounding bones highlighted in the pose editor.

Try this in the 3D pose search tool when drawing a bent arm from slightly in front. Select Left Elbow, leave Gender on Any, and choose Match angle under Camera angle. Drag the circle on the elbow to increase the bend. Orbit the camera until the forearm sits in front of the upper arm, then select Find photos. Inspect the first few crops for the inside elbow crease and whether the forearm crosses the upper arm at the same point as in your sketch.

To establish a baseline, search Left Elbow with the default skeleton and viewpoint, Gender set to Any, and Camera angle set to Match angle. This returned 100 matches in our test. The first crop was from Amir Javadzadeh’s Unsplash photo, ID Tng-hruxTCw. The crop shows how the sleeve sits at the elbow. Open the result and check the wider frame to see the rest of the figure.

Run the same elbow search with Camera angle set to Any angle. This gives the pose finder more angles to choose from while it still compares how the arm bends. Keep a photo from the first pass for silhouette and perspective. Use the second pass to study the joint itself, especially if sleeves or hair obscure the crease in the best camera match.

Open a promising crop to see the whole frame. Check how the shoulder sits over the rib cage and whether the wrist is carrying weight. A tight crop can make two poses look similar even when those surrounding details would change how you draw the gesture. Keep the photographer and the original photo page with your reference notes.

To study a straightened arm afterward, keep the camera fixed and relax the elbow until the wrist and shoulder nearly align. Search again and look at the transition from the upper arm to the forearm. Comparing a bend and an extension from roughly the same direction can help you decide where to put the sharp edge of the elbow and where to soften the contour.

Try the elbow pose search

Read and Refine Your Pose Search Results

Compare the part you selected

The photo index stores detected body landmarks. Pose search results are ranked by how closely those landmarks match the selected part. The tool can show a mirrored crop when that side is a better match. Use the crops to study a relationship such as the shoulder angle or the overlap between thigh and calf. Open the full photo to check balance, hand placement, or the direction of the gaze.

Separate the pose from the viewpoint

If the pose is close but the angle is wrong, keep the skeleton as it is and orbit the camera before searching again with Match angle selected. If the point of view is close but the joint looks too straight, change the bend first. Varying one thing at a time makes it easier to tell which change improved the reference search. Reset the skeleton when an earlier adjustment leaves you unsure where you started.

Recover from a sparse or empty gallery

Check that a body part is selected and the photo data has finished loading. If the gallery is sparse, set Gender to Any and use Any angle when the chosen joint offers it. Joints that are hidden, outside the frame, or seen from an extreme angle can be harder to match. For a crouching figure, try the hip if a knee search misses how the thigh angles toward the torso.

Choose a reference for the drawing task

For a gesture study, look at the direction of the limb and the weight it appears to support. For a foreshortening study, compare the distance between landmarks in the image and note which one overlaps the other. For a clothing study, open the full photo to see where the fabric bunches and where it stretches. These checks help you choose among visually similar matches.

Use a second search for an adjacent joint

A reference for a crouching leg may show exactly the knee bend you want while the direction of the pelvis remains unclear. After checking the knee crops, keep the skeleton and camera in place and switch to the hip on that side. The pose finder will compare a different set of landmarks against the same pose. Pick photos that agree about the angle of the thigh before combining what you learn from each search. This also works for a raised arm when you need one reference for the elbow and another for how the shoulder meets the chest.

Check side and orientation before drawing

Left and right describe the figure’s own sides. When the figure faces you, its left side is on your right. Check the model from behind or orbit it partway if you lose track as you adjust the viewpoint. The gallery can mirror a source photo for a closer comparison. If you open the original photo page, look for asymmetric details such as a watch, a pocket, or a sleeve to tell whether the source corresponds to the displayed orientation.

Compare landmarks across different body types

Two people can hold the same pose with different proportions and contours. To check a candidate, mark the centers of the joints you can see and sketch a line through the long axis of each limb. Compare those directions with your setup before paying attention to muscle definition or clothing. If the key angles agree, you can use the photo to understand the joint while keeping the proportions you chose for your character.

Set a usable camera for an extreme angle

For a view from above or below, orbit the model in small steps and watch for overlaps that hide the joint you want. If the hand covers the elbow from the exact angle you set, move the camera until both segments are visible, then run another search. Keep the closer viewpoint for your composition and use the clearer reference to check the structure beneath the overlap.
Pose Search FAQ

Can the pose finder match a whole body pose?

Pose Search ranks photos for the selected body part or joint. The rest of the skeleton helps you set the pose and camera, but a strong elbow match can still show different legs or a different head position. Open the full photo to confirm any other parts you plan to draw from it.

What do Match angle and Any angle mean?

Match angle uses the camera viewpoint in the match for a supported joint. Any angle compares how the joint bends across viewpoints. Use Match angle for a particular viewpoint or silhouette, and Any angle to study a bend from several sides.

Can I use the pose finder on a phone?

Yes. Drag the background with one finger to turn the view. To change the pose, start your drag on a joint circle. Use the zoom buttons as needed. Find photos takes you to the gallery after you edit the pose.

Why is my 3D skeleton missing?

The 3D editor needs WebGL2. Check that your browser allows graphics acceleration, then reload the page. Open the original tool to check it in its own tab. A failed photo thumbnail can have a separate cause because photos load from Unsplash.

Can I upload a photo to match its pose?

The web pose finder starts from a 3D skeleton and queries the original tool's indexed collection. Its search controls use a selected body part, the current model and supported filters. To work from a photo you already have, use it as a visual guide while setting the skeleton and viewpoint.

Where do the reference photos come from?

The original tool displays images from Unsplash. Open a result to see the photographer and an Unsplash link. If you plan to publish a photo or use it in a project, check its source and the applicable terms for that use. The thumbnail is a cropped preview, so use the source to review the complete image.